Friday, July 12, 2013

Sherwood Point Lighthouse

Sherwood Point Lighthouse
While in Door County Wisconsin, we were lucky to experience part of the annual lighthouse tours. We've stayed for a couple of days just exploring the area just driving around. We went to the Eagle Bluff lighthouse days ago and we were still exploring the remaining lighthouses.

Another awesome lighthouse in Door county.
While staying in Door county we saw a boat tour coming from Sturgeon Bay going around the coast to see lighthouses. The main event of this tour is to see Sherwood Point Lighthouse. This Lighthouse is located in Sturgeon bay and is one of the best attractions of Door county.

The best way to see this lighthouse is from the water.
The boat tour started out in one of the marinas in Sturgeon bay. The weather wasn't cooperating. It was raining. In fact, the schooner that the tour was on had no covers in it, which means we have to deal with the rain. The bad thing about it is that I didn't have my rain jacket with me.

It was overcast. It was hard to get color in the sky.
It was a good thing that the temperature wasn't that cold. One good lesson learned...whenever you're going out to sea, make sure to bring a warm water resistant jacket. I did this when we went to Maine, I wasn't sure why I didn't do the same here in Door County.

Equipment wise, I brought two bodies with two lenses attached. Since we are going to be at sea looking at lighthouses, I brought my Canon 400mm f/5.6 and my 70-200 f/2.8 lenses. Both telephotos for both bodies. It worked out great since the lighthouses were around at least a quarter of a mile away from the boat...I knew I was gonna need all that focal length power.

Another view of the lighthouse from the other side.
When we arrived at the location I just started snapping to get the best possible shots that I can. It was still raining bad and it was overcast. Other than that, taking shots of the lighthouse was not bad at all.


Again, another lighthouse that is pretty much worth it to visit. In my opinion it is best to view the lighthouse either from the water or from the air...just make sure you have enough focal length power to fill your frame with it.

Friday, July 5, 2013

Eagle Bluff Lighthouse

Eagle Bluff Lighthouse in Door county Wisconsin.
Door County Wisconsin is a place of lighthouses. When we went there the first week of June, the lighthouse festival was going on. The lighthouse festival is a couple of days of lighthouse tours from edge to edge of the Door County peninsula.

The tower.
One of the most beautiful lighthouses in Door County Wisconsin is the Eagle Bluff Lighthouse located in Peninsula State park. You actually go into the state park and drive for about 3 miles from the entrance till you reach the lighthouse.

Another view of the tower from the back.
The road to the lighthouse isn't too bad at all. It is lined up with viewing platforms where you can take pictures of the bay. They have benches and parking areas where you can park your car and enjoy the scenery.

The lighthouse straight on.
The lighthouse is visible from the road so you'll never miss it. When we got there I was wowed when I saw the rich yellow and red color of the lighthouse. It is beautiful even from a distance.

From the lawn.
On this trip I brought along 2 bodies and 2 lenses. I brought my favorite combo of the Canon 70-200 f/2.8 IS, and the 17-40 f/4 L. On scenic tours, this combination is really great. The tele zoom covers scenery that you cannot reach with your ultra wide and vice versa.

The lighthouse near the entrance.
It was overcast when we got there but it was still a pretty good time taking photos. I kinda like it a little overcast when taking shots because overcast skies can be pretty dramatic as seen on some of my shots.

One of the most beautiful lighthouses I've seen.
The area is pretty quiet. We got there and there was just another couple touring the area. I'm not really into squeezing myself in an area full of people anyway so our trip was awesome.

Shot from the front.
The lighthouse was constructed in mid 1800's and it shows. It is very nice to photograph especially when you can capture the texture of the old bricks. One piece of advice, when photographing the lighthouse from the front, make sure you have a wide angle lens with you...it just makes the lighthouse look ore awesome.

A wide angle shot of the front.
An anchor in the same place as the lighthouse.
There is a little piece of history written at the bottom of the anchor displayed in the lawn. Just walking around the area, you can feel the rich history surrounding the lighthouse.


When you are in Door County Wisconsin, I recommend visiting this lovely lighthouse. It's got plenty of history and at the same time beautiful to look at and photograph.

Saturday, June 15, 2013

Up in the air with The Grizz in Door County WI.

A week ago we went up to Door County Wisconsin. It is a beautiful place famous for its cherry. Cherry pies, cherry soda, cherry jam, you name it they have it. It's a place excellent for relaxing, where the towns are close together, and there is a port in almost every town you visit as it is a beautiful peninsula.

One of the beautiful islands in the lake.
On our second day at Door County we were trying to find a great way to see the peninsula. We browsed online and there were a lot of tours going on that week. Then we saw the Grizzly scenic air tours. And we booked a tour and we scheduled it on that friday because it was supposed to be really sunny and dry.

Eagle Bluff lighthouse from the air.
Friday came and we were excited to go to the airport to meet Grizzly Dave, the pilot of the plane that is taking us on the tour.  He briefed us on where we are going, what we are expected to see, and how we can take the shot perfectly from the air.

Horseshoe island.
For this trip I packed 2 bodies. I have my Canon 5D MK2 equipped with a 17-40mm f/4 lens and a Canon 6D equipped with a 70-200mm f/2.8 lens. These two lenses work perfectly for scenic trips, and I never fail to bring both of them on tours and vacations.

The beautiful shoreline from above.
Grizzly Dave just warned me to stay away from the window as far as I can with my 70-200mm as it is a big lens. I was told that a guy once popped his window out with his camera lens. For safety reasons I took out my lens hood to at least cut off about 4 inches away from my lens. I could just imagine the horror on that guys face when he busted the window open of a plane currently in flight.

The water is clear that you can see the bottom in some areas.
The trip was bumpy at first, as we flew a lower altitude above the trees. As soon as we gained altitude, the ride became more stable and we were able to look into our viewfinders better.

Two sunken ship hulls visible from the air. 
While the tour was going on Grizzly Dave pointed out the different towns, he told us stories about some lighthouses, and he pointed to us which is which.

Cana Island Lighthouse.
While we were over at Door County, they had a lighthouse festival. Door County is home to 11 lighthouses. Seeing lighthouses on a land tour is great. Seeing the lighthouses from the air is just magnificent.

Canal Station Pier-head lighthouse visible on the lower right side.
Most of the time I shot with the 70-200mm lens. The focal length is just right as it is not too long and at the same time not too short. I set my dial to shutter priority so I can set a speed that I wanted. For these shots I set it to around 400/sec. It was a very bright day so my iso was at 100, no need to worry about noise at all.

The Steel Bridge in Sturgeon bay.
One thing I forgot to bring is a polarizer. It would've helped to eliminate reflections from the window, I managed to minimize reflections by shooting at the right angle at certain times, the polarizer would've been great to have though.

The dock in Sturgeon bay.
Throughout the tour we were never bored with Grizzly Daves stories and jokes. He is indeed a very funny guy. He told us that there were numerous times that guys would propose to their girlfriends during the tour. In fact, as of that time there were seven proposals...six of them were successful...hahaha.

Seeing the peninsula in a plane is a different experience.
I highly recommend the tour. It was very entertaining and fun. For photographers, it is an excellent way to photograph landscapes in a very unique way. Would I do it again? Heck, I'd do it in a heartbeat.

One of the beautiful docks in Door County
For more information about Grizzly scenic tours, visit their website at: http://www.grizzlyoverdoorcounty.com

The Grizz himself.

Thursday, June 6, 2013

Lowepro Vertex 100

The Lowepro Vertex 100.
Here I am again with another Lowepro review. As I told before I am never paid to do reviews. Lowepro is just a brand that I have learned to love because of their awesome bags. So far I own 5 Lowepro bags. I buy a certain model depending on what I need. Different photographers with different setups need different bags, and the Lowepro Vertex 100 is a bag that I will use for a light to medium setup that will allow me to carry a small laptop as well.

Like it's big brother, it's got a tripod/monopod holder.
 Let's start off with the outside features of the bag. Like the Vertex 200 and 300, the Vertex 100 has a tripod/monopod holder that is height adjustable. The Vertex 100 has a similar Glide Lock system that allows you to adjust the height of the tripod strap to however you want it according to the tripod size that you will carry on it. The bottom compartment that grabs the bottom legs of the tripod is detachable for a smaller bag size. I just like to keep it on all the time.

The zippers are sealed to keep out dust and moisture.
The Vertex 100 backpack, being considered a professional camera backpack offers weather resistant zippers for the main compartment that keeps out dust and moisture. This also gives the zippers a tighter and more secure feel.

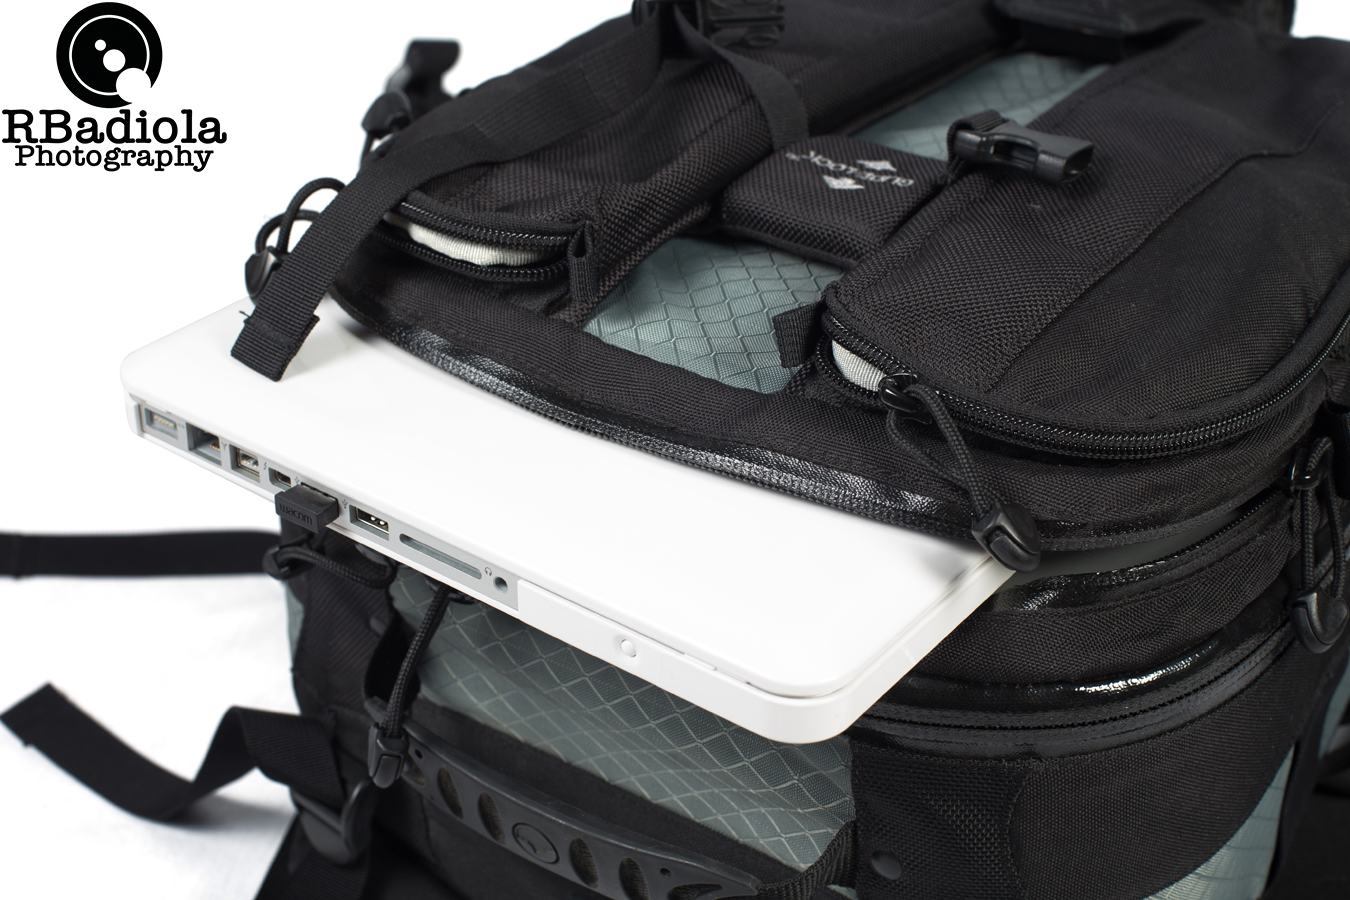
It can hold up to a 14" laptop.
One of the main reasons I bought this bag was the laptop compartment. My Lowepro Flipside backpack doesn't have one so having this one is a bonus. It can store up to a 14" laptop securely. 

A rain cover is hidden in a pocket at the bottom.
The rain cover is perfect for making the bag water resistant.
At the bottom of the bag is a rain cover that covers up the bag when you need it. The nice thing about it is that the rain cover is a part of the bag. You can keep it in the pocket when you don't need it.

One of the front compartments in the front.
 The front left compartment of the bag has 2 zipped pockets that can hold filters or batteries or anything that is thin. It also has 3 pen holders and a pocket on top of it.  I mainly use the zipped pockets for extra batteries.

The right compartment of the bag.
The right front compartment has three small pockets that can hold cables, wipes, or anything that's thin too. Opposite of that side are three card holders that can hold cf, sd, memory sticks etc. inside their cases. Another small pocket is below the 3 card holders.

The inside of the bag.
A good amount of equipment fits inside.
 One of the main reasons why I chose the Lowepro Vertex 100 is the amount of equipment it can carry for being a smaller bag. I can fit 2 slrs with medium sized lenses attached. Shown in the photo is my Canon 50d and 5D MK2 with a 24-105mm and an 85mm lens attached in the bag facing each other, along with a 400mm f/5.6 lens on the side. On the other side is a Canon 430EX II lens and a Canon 28-135mm lens. And they all fit comfortably inside. I can also fit a 70-200mm lens attached to a body in front of another body without a lens attached...it's all up to you how you want to set this up but the Lowepro Vertex 100 can hold a lot.

The padded shoulder pads are really comfortable.
The shoulder pads are similar to the Vertex 100. Well padded and comfortable. It also features a waist strap that is padded as well. Very nice feature to have especially for long hiking trips to keep the bag flat in your back.

The nice waist strap to keep it flat on your back.

The detachable tripod catch.
The tough handle on top for carrying.
The same features of a Vertex 300 in a smaller package.
Here's a video showing the key features of the Lowepro Vertex 100:


The Vertex 100 is an exact copy of the Vertex 300 without some features of its bigger brother. The Vertex 100 doesn't have a cover that hides the shoulder straps if you don't need them. It also has a smaller inside compartment space. The thing that I don't like about the Vertex 100 is that it looks pretty bulky when carried. It looks like it protrudes more in your back than any other backpack of its class. Other than that the Lowepro Vertex 100 is an awesome backpack to have like the Vertex 300. For the best equipment protection I would get a Lowepro Vertex series bag anytime.


Saturday, May 25, 2013

The Lowepro Passport Sling bag

The Lowepro Passport sling bag.
Some days when you don't want to carry a lot of camera equipment because you don't need to, you want something to put it in to keep it protected when you aren't using it. Some people don't like camera backpacks. I love mine...but for some people, they don't like a camera bag pulling down their backs. One solution is have a shoulder/sling bag.

For people who don't like carrying backpacks.
This is my third Lowepro bag that I have reviewed here on my site. I just wanted to let everybody know, Lowepro isn't paying me to do this. I have bought this bag with my own money. I have never had problems with my Lowepro bags that's why I keep on buying them.

Pockets on the side for stuff to put in
The Lowepro Passport sling has a couple of pockets around the side. You can use the pockets for holding documents such as maps, flyers, brochures, etc. This is especially useful when you're walking around lets say in a zoo where you need a map in hand. The outer pocket can also hold a small water bottle. In my sample, I am using a 16 oz water bottle with no problems at all.


Enough to hold a dslr with lens attached.
The inside of the bag has a camera compartment enough to hold a dslr with a medium telephoto zoom lens attached. In my sample shot I have my Canon 50D with a 28-135 lens attached to it. The camera can be placed on its side, or with the lcd at the bottom. It really depends on which position you are comfortable with. Next to the camera compartment, you can put an extra lens, or a speedlite, whichever you need more. In my sample shot, I used a Canon 85mm f/1.8 lens.

There are 2 extra little pockets inside too.
Two extra pockets inside enable you to store 2 long items...such as a tube of lotion, lip balm, memory card readers, etc.

The side of the camera compartment has a memory card pocket.
On the side of the camera compartment you'll find a memory card pocket for carrying an extra memory card with case. Lowepro usually has these in their bags which is really useful. Both my vertex and flipside camera bags have these too.

The removable camera compartment. 
One good feature of the bag is that you can remove the inner camera compartment if you need more room inside the bag. This basically converts this into a regular shoulder bag that has no dividers inside. The inside compartment attaches to the bag using velcro strips which are easily detached.
The zipper at the end of the bag unzips for more room.
At the end of the taller side of the bag, you'll find a zipper that you can unzip if you need more room in the bag. You just unzip it and pull the two opposite sides out. This expands the bag to make it bigger. Another very useful feature of the bag.

Here's a short video of the features of the Lowepro Passport sling.


So how do I rate the Lowepro Passport sling? With all the useful features and options, Lowepro simply designed this bag magnificently. The construction is pretty good, with materials that will seem to last for a long time. The price point is pretty good for this kind of bag too. Around $45-$60 online this deal cannot be beat.