Monday, December 31, 2012

My best of 2012 equipment list

2012 is almost done. It has been fun reviewing equipment that I have acquired this year. There were good ones, bad ones and THE very best ones. Some of these have been reviewed on this site before and some of them are still pending. However I will give you the best pieces of equipment I have gotten this year.

Expoimaging Rogue Flash Bender
Expoimaging Rogue Flash BenderOne of the best if not THE best flash modifier you can buy for your speedlite. I've tried numerous modifiers such as snoots, beauty dishes, mini soft boxes, etc for my external speedlites and nothing really compares with the Expoimaging Rogue Flash Bender. It's bendable so you can use it whether your speedlite head is positioned for portrait or landscape. It folds easily, and doesn't weigh the flash head down. The lightsphere produces light that is pretty soft and even...but the bulk and weight made me switch to the Flash Bender.

The Canon 24-105 f/4L IS USM.
Canon 24-105 f/4L IS USM - The new version came out this year...the Canon 24-70 f/4L IS USM. It features new optics and a new construction, but for like $700 less, I'd still go with my trusty Canon 24-105 f/4L. It's longer, and it has been around for a long time. The 24-105 f/4L is sharp all around the frame. For general purpose, you can't go wrong with this lens. It's been around...but I just got one this year.

MeFoto A1340 Tripod travel tripod.
The MeFoto A1340 travel tripod -  MeFoto is created by well known tripod/head maker Benro, who's been around for a while. The A1340 travel tripod features a small profile when folded, and it also transforms into a monopod. You get a sturdy tripod and a monopod at the same time. The ballhead is well done, comparable to moderately priced bullheads. 


Epson Artisan 1430 printer
Epson Artisan 1430 printer - If you print 13x19 photos or smaller, the Epson Artisan 1430 is a very good printer to have. It has wifi, 6 individual cartridges, and Epson quality and reliability.  After I got mine, I have printed my images into 13x19 glossy, matte, or metallic paper...and it never fails to wow me every time. It's under $300 so you can spend all your savings for paper and ink.

The Apple Imac - After having my old imacs' hard drive die on me, I fixed it but I wondered about getting a new one. My old imac was the very first aluminum one released in 2007. I thought it was time for an upgrade. I got the Quad core i5 model released in 2011. It's a year old but still kicks some serious butt. I never realized the power of the Quad core processor until I edited video. Of course I could have gotten the $2000 mac pro, but I didn't have two grand that time.

Lowepro Vertex 300 AW
The Lowepro Vertex 300 AW backpack - If you need a BIG camera bag for travelling with multiple lenses and bodies, get this...nuff said.

The FX5 flash extender.
Visual Echoes FX5 better beamer flash extender - If you are a hardcore birder, get this. But be careful when leaving this attached to your speedlite on a sunny day, as it can melt the casing of your speedlite. I was very impressed to what it does!

The Canon 400mm f/5.6 USM
The Canon 400mm f5.6 USM lens - Also, if you are a birder with little budget, get one of these bad boys. But don't forget to get a monopod with it!

Canon 50mm f/1.4
The Canon 50mm f/1.4 USM lens - I know it's been long overdue that I get this lens. It's better late than never.


BlackRapid Double (DR-1 Double strap) Strap - I got the BlackRapid Sport R-Strap earlier this year and I have been very pleased with it. This Christmas I got something better...The DR-1 double strap which is the dual strap version of the much talked about BlackRapid strap. The BlackRapid Double strap feels so balanced in your shoulder when you are carrying 2 bodies with lenses in them. It actually feels better than carrying a camera backpack mainly because the weight is evenly distributed on both sides of the shoulders instead of the weight pulling your back. I was afraid it would feel awkward with the dual strap but it felt really natural. The price is pretty steep at around $129 but hey, it's a great investment if you want to carry 2 bodies together in one time.

Adobe Lightroom 4 - This is the software that wowed me in 2012. The best thing about Lightroom 4 is the ability to bring out lost detail in the shadow and highlight areas...still it depends on how bright your highlights and how dark the shadows are but oftentimes Lightroom can fix it. 

and the best one of all...

The Canon 6D
The Canon 6D - I didn't have the money to get a 5D MK3 so I got this instead. A little full frame camera that does a lot that its big brother does. The thing that impressed me the most is the wifi capability and the lowlight awesomeness.

Have a happy new year everyone!!!


Sunday, December 23, 2012

The Chicago Botanic Garden Wonderland Express

The Polar Express Train. One of the attractions at the Wonderland Express.
Christmas is here and all sorts of holiday stuff is everywhere. I was so excited to hear about the Chicago Botanic Gardens Wonderland Express as we were there last year and it was great! This year, I'm more excited as I am going to see the display and test out my newest Canon full frame body...the 6D. I just got my 6D at the beginning of the month and I'm still testing it out. This is a very good chance to test out the 6D's low light capability and the improved burst performance from the Canon 5D MK2.

The 6D's low light capability is excellent for me.
Remembering from last year, I brought my Canon 5D MK2 with my 70-200 f/2.8 IS USM lens. Knowing how dark in some parts of the venue is, I brought along my trusty 430EX II speedlite. Honestly, in situations like this I hate using a flash. I would rather shoot with natural lighting, However there are parts of the exhibition where light was almost zero. The 5D MK2 isn't that very good focusing in lowlight although the high ISO performance is pretty good because of its excellent sensor. Still, I struggled to lock on my subjects in very low light with the MK2.

One of my favorite trains in the exhibit.
This year, hearing about how excellent the 6D in lowlight is supposed to be, I packed my bag with it and my 70-200 f/2.8 IS USM lens. Just in case, I also packed a speedlite. I also included my Fotopro Carbon fiber monopod. So we went, hoping to be there as early as we can to avoid the rush of people.

The Picasso Sculpture in downtown Chicago.
So I set my 6D's autofocus drive to AI servo. This will allow me to shoot without locking on to a specific part of the frame. This is very helpful when tracking the model trains going down the train tracks. I also set the shutter to multiple burst mode. This will enable me to take a sequence of shots and pick which shot is the best. Being faster than the burst mode of the 5D MK2, the 6D's 4.5 frames a second isn't bad at all. I have shot birds in flight with the 5D MK2 and the 6D is so much faster. I set my mode to shutter priority. I varied my shutter speed from 100th/sec to around 200th/sec. The trains move, so I need a bit of speed from my shutter to avoid motion blur without the aperture being too open or the ISO being too high. I also set my ISO to automatic, so that's one less variable to worry about in this light changing place.

The Chicago Botanic Garden Bell tower model.
I just shot and shot and never worried about my settings. I actually came here to shoot and not tinker with my settings. With my monopod attached, I shot frame by frame and I loved it. The 6D's ISO varied from as low as ISO 400 to about ISO 12800. With my other bodies, when you go above ISO 2000, the photos are barely useable. I'm astonished how the 6D's 12800 ISO looked really good. When you use ISO 12800 with a wide open aperture at a reasonable shutter speed, you'll know how dark a scene is.

Yes...the ISO for this shot was 12800
 The 6D's auto ISO is the best auto ISO I have ever used on a Canon dslr body. It somehow is really responsive to how much light you need. The 50D and the 5D MK2's auto ISO features are very limited compared to the 6D. It also lets you adjust the maximum ISO you want to use...a very nice feature not found in other Canon bodies. I shot a couple of times outdoors in the dark and the auto ISO kicks in and it just knows how much you need. Shooting in Raw format helps out a lot as you can minimize the noise using Adobe Lightroom and the results are excellent. So basically the speedlite stayed in my bag.

The Chicago Botanic Garden sign.
The exhibit features models of great Chicago landmarks such as the Picasso sculpture in downtown Chicago, Wrigley field, the Art Institute, Ravinia, and many more. There are a ton of train models going around and around. You can even ask the operators to slow them down or even stop them for a shot, which was really nice of them to do. The structures are made out of twigs and other organic materials. All laid out beautifully inside one of the Botanic gardens indoor buildings.

The structures are made out of twigs and other organic materials.
The entrance of the exhibit showcases a ton of gingerbread houses. In the same exhibit, you'll find the Polar Express train. This surely brings out the holiday feeling in the exhibit. One suggestion though...when you want to go in to take pictures, avoid bringing in a tripod. Some of the train operators reminded me to be careful with my monopod...a tripod might actually get you kicked out of the exhibit.

The Ravinia arch. It's actually about a block away from the Botanic Garden.
After you see all the trains, you can have a hot cup of chocolate with marshmallows complete with cookies and other treats. What's even more entertaining is that carolers go around singing christmas carols while you eat and drink.

I caught this closeup of santa in one of the trains while it passed by.

One of the church models in the exhibit. 
So it was a really fun night. I get to see an awesome exhibit and test my new Canon 6D at the same time. The Wonderland Express only goes until January 6, 2013. I highly recommend it especially for the entire family. For more info click here.

Thursday, December 13, 2012

Canon 6D sample shots and Lightroom edits

Today, Adobe has released an update for Lightroom which now includes the Canon 6D as one of the supported cameras. As we all know, the 6D just came out about a week and a half ago and Adobe didn't have the camera raw support for it which is usually what happens when a brand new model gets released. Now that has taught me a lesson. When I got my 6D and started shooting with it in raw format, all my images had to be converted using the Canon Digital Photo Professional software so the files can be useable. I love converting my files in Lightroom and it was kind of a pain to convert it in a software I am not really familiar with.

Converting the raw files in-camera isn't so bad. The only thing is that it is really faster doing it on a computer. The modifications to the images are limited too. With Lightroom there are plenty more options in image adjustments. And that is good especially in a situation where you need more color and contrast as in the shots that I just did.


Well, Canon 6D owners should rejoice as Lightroom is now updated to 4.3 and Camera Raw to 7.3! I have been waiting for this since I got my 6D. Now I can convert my files easily.


I went to my favorite botanic garden to try out my 6D. Together with my Canon 17-40mm f/4 L lens and my Canon 70-200mm IS USM lens, I tested out photographing some landscapes and other stuff. I wanted to get used to the 6D's controls and menus. So far, I love it. It's not really that much different than my 5D MKII, except for that modified wheel and joystick combination and some button modification, it is basically the same camera...but better.


It was cloudy when I came so my clouds are grayish. There really is not much color in it. That's one disadvantage shooting on a cloudy day. Although the results weren't that bad. I was able to save my clouds in Lightroom. I didn't even have to bring these images in Photoshop except for putting the watermarks in them. Everything is pretty much done in Lightroom.


 The 6D is pretty much loaded with some features that you'll find in the 5D MK3. One of the most awesome feature is the lens aberration correction control. This allows you to use some lower quality lenses and eliminate or minimize the color fringes that the lens produces. This is also very useful for wide angle lenses such as the Canon 17-40mm f/4L...which is one of the lenses I commonly use.


 Now that the camera raw update is here, I'd be sure to enjoy shooting more with my 6D!

Friday, December 7, 2012

The Canon EOS 6D

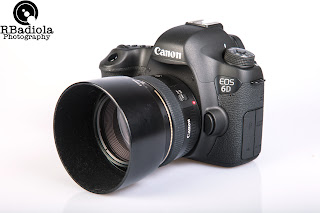
The Canon 6D. 
2012 has seen the release of a lot of full frame dslr cameras. Nikon released the D4 and the D800, Canon released the 5D MK3. At the 2012 Photokina, Sony announced the SLT-A99, Nikon followed with the D600, and Canon followed with the 6D, which as of the time of writing, is the smallest and the lightest full frame dlsr.
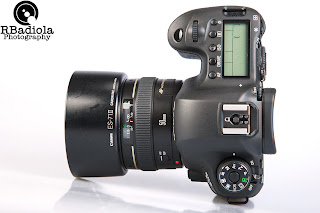

Canon 6D top. The mode dial now has a lock button.
The 6D is more of a starter full frame dslr. By starter meaning it doesn't have all the features of a professional full frame camera like the Canon 5D MK3. Such features like an 8000/sec maximum shutter speed, 61 autofocus points, a fast 6 frame per second burst, a pc port and much more. But that doesn't mean that this camera is a slouch. The 6D is more of a basic featured camera with some of the pro features removed. It's geared toward shooters who are looking to upgrade from their aps-c cameras such as the 7D, 60D etc. to a full frame camera.
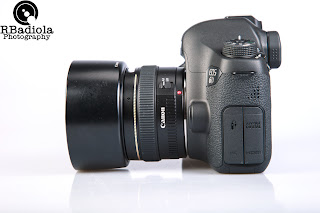
The ports are minimized, no more pc port and the a/v out and usb are now combined.
 I decided to get one as I needed a full frame backup for my 5D MK2 which has become my workhorse camera. I still have my Canon 50D, but I was longing for another full frame camera. I shoot a lot of wildlife and a lot of times I shoot with a higher ISO. Full frame cameras are very good in low light and high ISO settings so a full frame would be more ideal to get for me than an aps-c camera. I cannot afford to blow $6000 on a Canon 1DX which is perfect for wildlife shooting. The Canon 5D MK3 was also a good candidate for me but it's also a thousand dollars more than the 6D. So I went for the cheapest alternative.
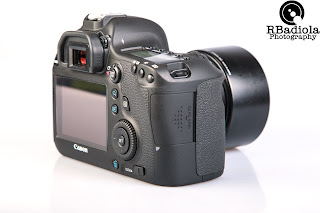
Canon has now decided to use an SD format for this FF camera.
I ordered it online and got it after around 3 days. Opened up the package and held the camera. The body is light compared to the midrange 50D, also lighter than the 5D MK2. It is also smaller. The body from side to side is narrower than a 5D MK2. It felt like holding a bigger rebel that's better built. The joystick that were in the 5D's is gone. Canon has decided to incorporate it together with the control wheel. Being so used with the 5D MK2 joystick, I kinda had a difficult time adjusting to it. Canon also took out the control buttons from the 5D MK2's left side. The preview, zoom and trash buttons are now on the right side of the camera...all easily accessible by your right thumb. Nice work here Canon! It also has a lock button for the wheel. The video recording and the live view are on the same switch. You switch between live view and video and press the start/stop button to activate whichever it's switched on. The depth of field preview is now on the bottom right part of the lens mount instead of the bottom left. The mode dial now features a lock which was offered by Canon as a customized feature for the 5D MK2. This prevents you from changing the mode accidentally.
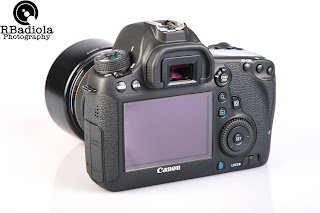
No Joystick controller for this body. Canon has combined it with the control wheel.
The on off switch is now in the mode dial. Kinda different from past 5D's and the XXD series cameras except for the 60D. The layout of the 6D's body is highly similar to the 60D, sans the articulated LCD screen, which Canon says they eliminated to maximize the durability of the 6D, which makes good sense. One big change for the body was the use of SD cards instead of cf cards, at least for me as this is my first DSLR that uses an SD card instead of the compact flash. There are advantages and disadvantages. The SD cards are somehow cheaper than the CF's, although I have a good collection of CF cards, which means I have to get at least 2 new SD cards for this camera. Not really a biggie as I bought it with a free SD card, I just gonna have to buy another one. 
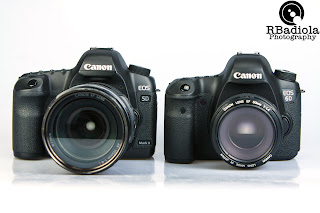
Compared to the 5D MK2 The 6D has a smaller, lighter, narrower body.
 Now to the more technical aspects of the camera. The 6D, is equipped with a Digic 5+ image processor which is the same as the 5D MK3. It has 11 focus points which is an improvement over the 5D MK2's 9. Although it lacks the AF point area expansion which is a feature in the 5D MK2 that adds focus sensitivity near the central focus point of the camera. This is helpful when tracking something fast with your central focus point, unfortunately the 6D doesn't have that. It still has focus micro adjustments for EOS lenses that other advanced Canon bodies have. This enables you to tweak your lenses autofocus depending on the lens that is attached. It now features a chromatic aberration correction that the 5D MK2 lacks that is also now on the 5D MK3, which means some of your older, cheaper EOS lenses will produce images with minimal aberrations with this adjustment. The ISO goes from ISO 100-25600 standard, 50-102800 expanded. The ISO 50 is very useful in the studio where you use a ton of lights. It also features 2 levels for silent shutter, very useful for weddings where a click of the shutter proves to be so distracting.  It does video too...1080p at 30 frames a second, with an external mic input for stereo sound. Oh i forgot, the 6D focuses excellently in low light. 

Now here are the coolest features of the 6D. 

The 6D is now equipped with a gps which is very useful for landscape photographers. It adds location information to the images so it keeps track of where the images were taken. 

It has an in camera RAW to JPG processor. You can now process your images with the camera itself. It let's you adjust the brightness, size, WB, lens distortion, aberration, noise reduction, color space, peripheral illumination, picture style and auto lighting optimizer. After everything has been adjusted the image will be saved as a jpg.

In camera HDR processing - for you HDR aficionados out there, you can now process HDR files in camera, the disadvantage to the 6D is that it only does it in jpg mode, not with RAW as the 5D MK3 can do.

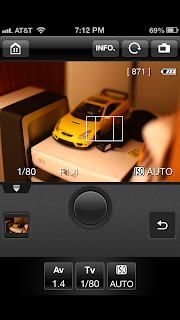
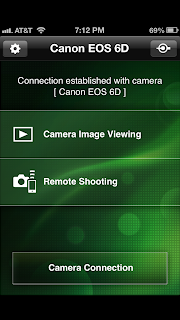
Wifi - this is one of the reasons that got me into this camera. You can now view your images in the camera using your smartphone via the dos remote app. Also, you can control your camera with your smart phone. The camera switches into live view and you can view what's in the viewfinder from your phone. The setup is pretty easy, it took me about 5 minutes to set everything up. 
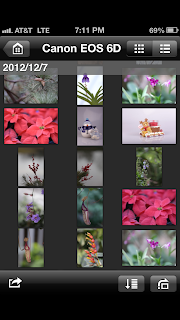
You can view your images with your phone, and save them in your photos.

Live view mode works in your smartphone. Wirelessly control the 6D.

The Canon EOS app interface, pretty simple.

The wifi control with the smartphone is smartly done. The images that you view in the phone aren't really saved in the phone. They stay in the camera but you can save them in your pictures folder in your smartphone if you want. It actually leaves the raw file in the SD. This makes the process of viewing them faster than when actually saving the files in the phone.

You can also email, send to Facebook, etc. the photos in your 6D. You need an existing wifi network to connect to. You will also need a Canon image gateway account, which is free. Once you all have that, you can send the photos directly from your 6D.

As of the time of writing, my existing camera raw plugin on my mac does not support the 6D yet. I had to convert everything in camera using the built in RAW processor in the 6D. It works, although not as good as Adobe Lightroom 4. That is a disadvantage when buying a camera that has just come out days later.

I tested my 6D today and got a couple of shots. It was cloudy today do it was really hard getting color on my clouds in my shots. I had the day off so I really didn't have the choice.


These images were processed using the in camera RAW converter with basic adjustments. Again these images would have more pop if they were processed in Lightroom. As of now, the camera raw plugin doesn't support the 6d YET. 

Using the 6D, I conclude that it handles pretty well. You don't get the bulk and weight from a 5D MK2 but it also doesn't feel like a toy, like a Canon Rebel XTI. It is actually one of the best feeling cameras in your hand. The controls especially the wheel/directional button takes some time to get used to, especially if you were so used in using the 5D MK2 or a 40/50D. Although at the end of the day, I got so used to it that the 5D felt strange. The shutter sounds different compared to older EOS cameras. I like it. especially when you can tone it down. The auto ISO works excellent compared to the 5D MK2, it just works the way you want it to. The wifi I admit is one of the cameras strongest selling points, for some photographers this is an unnecessary feature, but once you use it you'll be impressed. 

Now on to the comparison between the 5D MK3 and the 6D. The 5D MK3 has 22.3 mp against the 6D's 20.3. Not that much difference. Even if you print out 16x20" prints, 2mp would be barely noticeable. The 5D MK3's continuos drive is 6 frames per second against the 6d's 4.5, in some cases that would make a difference, but 4.5 frames per second isn't bad for fast action shooting, it's better than the 5D MK2's 3.9 fps. I've used the 5D MK2 for birding, and anything faster than the MK2 is better. The 5D MK3's focus points are 63 compared to the 6D's 11, there are cases where this is good and bad.   Sometimes you don't really need all those focus points to capture something. Sometimes more focus points are a hassle to select, but then again there are a lot of people who benefit from this. The 5D MK3 has a maximum shutter speed of 8000/sec, while the 6D has 4000/sec, but hey, how often are you gonna use that? If I was a very rich guy, I'd go for the 5D MK3. There are a ton more differences between the two, but for a thousand dollars less, I'd stick with the more basic 6D. The 5D MK3 is an excellent camera don't get me wrong, but a lot of photographers aren't gonna need the extra features that it has. If you need the extra features, go for it.

So far I have only tried the still imaging side of the 6D. Video is another thing. I'll do that some other time. For now, the still imaging side of it is more important for me.

Basically I have discussed the features of the 6D in laymen terms. I have discussed the features that you will use everyday. I'm not really gonna go to the real specifics...I'm just gonna let a review site do that for all of you.

If you need a new full frame body, or a secondary one for a backup, the Canon EOS 6D is a camera you should consider. The toned down version of the 5D MK3 doesn't seem that it's really toned down at all. It's loaded with features that a lot of photographers will find useful. I know I'll keep mine for years to come.

Thursday, November 29, 2012

The Brookfield Zoo 2012 photo contest

Brookfield zoo has just released the results for their 2012 photo contest...and I am one of the very proud winners!

The contest was open to everyone and is divided into an adult and children under 11 categories. My entry won 2nd place for the adult category.

My winning photo.

More about the photo...It was a hot day when I decided to go to my favorite nature center here in Illinois to take some bird shots. I brought with me my Canon 5D MK2 along with 2 lenses, my Canon 400mm f/5.6 and my 50mm f/1.8, I also brought my flash extender for the bird shots. As I was walking in the trails, I noticed these frogs that were just above the water filled with what I believe was algae. The birds were all over them, picking them out from the water one by one. So I decided to swap my lens from the 400mm to the 50mm. I think I actually brought the 50mm by accident. I thought it was the 100mm macro that was in my bag instead of the 50. The 50mm proved useful though as I can't get close enough with my 400mm. So I knelt down and took the shot. The frog that was in the shot actually didn't flinch. The shot came out as I wanted it.

Couple of months later me and my wife were walking inside Brookfield Zoo, a woman approached me and gave me a flyer for the photo contest. I then remembered this shot and submitted it. Luckily it won 2nd place!

Lesson learned...you really don't know what you'll come across when you are out shooting. So make sure you are prepared for whatever comes. I was prepared (somehow) and got lucky!

Click here for the Brookfield Zoo 2012 photo contest results.

Tuesday, November 20, 2012

Lowepro Vertex 300 AW Backpack

The Lowepro Vertex 300 AW backpack. Probably one of the best big travel camera backpacks ever.

Before our trip to Maine, I knew that my Lowepro Flipside 300 bag isn't enough to carry all the stuff i'm bringing in to our vacation. Maine is a pretty big area for photographs. The photo opportunities there is endless. From wildlife to landscapes...I know I need to bring a couple of my lenses to make the most out of our trip.

My Lowepro Flipside 300 backpack basically will hold one body with a large telephoto lens attached, 2 extra lenses and a speedlight. Or 2 bodies one with a telephoto attached and one extra lens and a speedlight. I need more than that on our Maine trip so I decided to look for a large travel backpack that can hold at least 2 bodies 2 large telephotos, and 2 smaller lenses plus a speedlight and a tripod. So I browsed online for a large travel slr backpack with a not so stellar price.
Both sides of the bag feature the glide lock system used to hold a tripod or a light stand.
I ended up finding the Lowepro Vertex 300 AW backpack. I found one online for less than $200, a price that I am willing to spend on a very good travel backpack. Usually it is priced around $250-$299. I was lucky I found one cheaper so I ordered it and it arrived 3 days later.


The front features a detachable tripod catch, multiple pockets and a tripod strap.
My first impression when I opened the box was that this bag is huge! I guess I got what I asked for. It is huge but not obnoxiously huge like a hiking bag. I actually can walk around with it in my back and not worry about bumping anything when I turn around. Surprisingly the bag alone is pretty light.


The back features padded shoulder straps for comfort. 
The front features a tripod strap and a tripod catch at the bottom. The tripod catch comes in unattached. It really is up to you if you want it attached or not. I find it really helpful when carrying tripods so I just leave it alone in there. The strap features a system called Glide lock which enables you to move it up and down for your tripod height. A feature not found in other bags.

The sides of the bag also has tripod straps and Glide locks. I find these really nice when you're going on a shoot and bringing in your tripod and light stands. I use the sides for light stands. It is so convenient that you don't need a separate bag for 2 stands.

The back has the padded straps for comfort. The straps are padded thickly for extra comfort during long hikes. It also has a waist strap to keep the bag steady along with your body...and those straps are padded too.

If you are not using the straps, the bag has a cover  so you can zip it up and it becomes a carry on bag.
How good is it as an outdoor camera backpack? The Vertex 300 has a built in rain cover which you can hide in the bottom compartment. This is a very nice feature when you're outdoors and carrying expensive equipment under not so good weather. Unfortunately, I haven't had a chance to use it so I can't tell if the rain cover is that good. By the looks of it, it seems like it's pretty weather resistant.


It has a built in rain cover.
The bottom has a compartment where you fold and keep the rain cover and also the back cover if you don't want to use the shoulder straps. Both flaps just fold into the compartment. You wouldn't even know that it's there. It closes by a strip of velcro.

The bottom pocket used to keep the rain cover and the back cover.
Now we go to the most important part...the inside of the bag. As what the photo shows below this paragraph, this bag has a ton of room for your equipment. As like other camera bags, the inside dividers are detachable using velcro. You can basically set the dividers however you want them to be. The top most part houses a body as well as the bottom part. I use the side compartments for lenses and other stuff.

The dividers are detachable for easy setup to however you want it.
The front panel of the bag that is inside has pockets that can hold your filters, manuals and anything that's flat. This is where I store my FX5 better beamer flash extender, since it stores flat.

This is where all the flat stuff goes. Filters, manuals, etc.
Now here is where the Vertex 300 shines...the room. I basically carried 2 bodies, 2 long telephotos, 3 extra lenses, a video camera, about 5 batteries, 3 chargers, a teleconverter, 1 speedlight, a shutter release, a tripod, 5 memory cards, a portable hard drive with power supply, a tablet, about 3 filters, a flash extender, a first aid kit, and I can't remember what else. It is like bringing your studio to a vacation. I love how you can carry 2 bodies with lenses attached facing each other. Now you don't have to worry about attaching the lenses when you get to your location.

The only thing that will limit you with this bag is the ability to carry it with all the stuff inside

The tripod holders are a plus with this bag. It has 3 of them!
The front pocket has 4 memory card compartments. In addition to 4 separate pockets.

The other side has 2 zipped pockets for batteries or whatever, plus a pen holder and another pocket.
The Vertex 300 has a buch of pockets in the front compartment. I use this to store my batteries, cleaners, wipes and swabs. A pen holder that can hold 3 pens is useful when you're on the go. On the other side the vertex 300 has 4 separate memory card holder. Of course, you can also put your memory cards in whatever pocket you want to.

The top front has a separate laptop sleeve that can hold a 15" laptop or a tablet.
The laptop sleeve can hold a 15" laptop or a tablet, I use this for a tablet which is really useful for seeing the previews of the photos that you take when you're on location.

There are endless pockets and compartments with this bag. Basically the only thing that will limit you with this bag is the ability to carry it with all the stuff that you can put in it. The construction is pretty tough, even the some of the zippers are protected from the elements.

Lowepro did a good job on this bag. I've always loved the Lowepro brand when it comes to bags. For the price, there is just no way to pass on this good deal.