Tuesday, April 24, 2012

Setting up a small on the spot studio


One lazy afternoon we went southwest to do a couple of flower shots. We then visited my fiancees mom just to spend an afternoon with the family. I was going around their house and found some pretty interesting items. I didn't want to take them home and photograph them so I had this idea to photograph them on the spot...by creating an on the spot mini studio.

Funny because that day I had both my Canon MR-14EX macro ring light and my Canon 430 EX II in my camera bag. I wasn't really sure why both of these were in my bag but it was awesome for this kind of setup I was going to do. Why is it so awesome? It's because the Canon MR-14 EX macro light has the ability to trigger my 430 EX II!

So I grabbed a piece of white paper, put it against a wall like a big background sweep. I then set my 430 EX II flash on its stand and put it near the sweep. This will serve as my background light. I then attached the Macro light to my camera using the Canon 100mm f2.8 macro. I then set my camera in a tripod.

I then set my macro flash to trigger my 430 EX. Did a bit of adjustment for my background light and I was ready to go.


You can see the flash from my macro light directly hitting the subject. For instances like this, it's good enough.


I was so close to my subject that I had to put my camera in a tripod to restrict movement.


Sometimes being a photographer means you'd have to improvise to shoot what you need to shoot. Having all the stuff you need with you helps out a lot in this situation. So basically this kept me busy the rest of the afternoon!

Saturday, April 21, 2012

Artists wanted

Artistswanted.org is a site that connects artists, photographers, designers and creative talent of all types with an excited international audience. They now have a contest called Art Takes Times Square where artists can win $10,000 in cash plus an exhibition in New York.

Also, the Artists work will be made into a larger than life video display shown on the most iconic signs in Times Square, presented by Chashama, and an after-party featuring Questlove of the Roots presented by Artists Wanted. Plus the artists work will be printed in a book distributed worldwide entitled Art Takes Times Square. Pretty neat stuff.

I entered some of my work which you can view here:
http://hardcoreboy.artistswanted.org/atts2012

Tuesday, April 17, 2012

Lensbaby Composer Pro with Sweet 35


Everybody is raving about the lensbaby. I was kinda curious about it after reading all the reviews about it online. What it is actually is a selective focus lens. Selective focus meaning that you can select your sweet spot (focus) and basically blur out the rest of the photo without post processing. You can do all of this in camera. There are a lot of people who like it and a lot of people who dislike it too. I suppose it's a love it or hate it lens. I honestly think that it's not bad. I managed to borrow one to try it out myself and here's what I think about it.


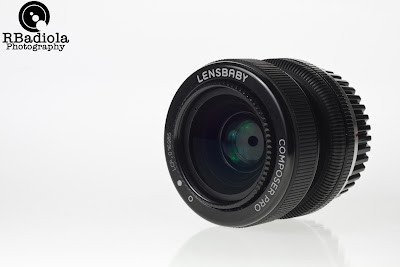
I tried out the lensbaby composer pro with sweet 35, meaning it's the lensbaby composer with a 35mm lens included. It's a lensbaby that has the aperture control built in to the lens. Some lensbabies have aperture disks that you put in to change your aperture...this one has the control in the lens itself, so all you have to do is rotate the aperture ring to change the aperture...just like those older film lenses back then.


The in lens aperture control at the tip of the lens, just like older film lenses.


The lens feels plasticky, though pretty heavy for its size. Most of the external barrel is plastic. I'm not sure if the ball itself is metal...the aperture ring is metal as well as the lens mount. The lens has 2 rings on the barrel. One is the focus ring and the other one acts like a friction knob as well as a lock knob for the tilt. On the composer pro with the sweet 35 lensbaby, the aperture ring is on the tip of the lens. You turn this to change aperture, as opposed to changing it in the camera as most modern lenses do. The viewfinder darkens as you narrow your aperture...this is how it was with film and older lenses. With digital and a modern lens, you can have a similar effect by pressing your depth of field preview button on your camera.


The top ring is for the manual focus, bottom ring is the friction ring and lock for the ball.


Snapping it it the camera, it felt like a usual canon lens. The metal lens mount provides the lens with a secure mount without wobbles or unnecessary movement as what you sometimes get with plastic mount lens such as the 50mm 1.8 and the 55-250 lenses. For the price I'd expect it to be with a metal mount anyway.


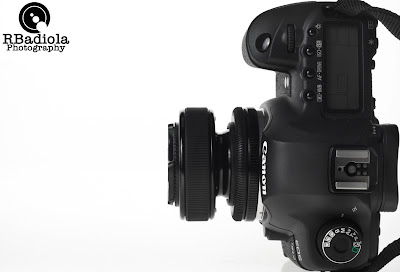
The Lensbaby composer pro attached to a 5d mk2 body.


Using the composer pro for the first time feels awkward. The learning curve for using this lens is somewhat between medium to difficult. I suggest using this with your camera on a tripod first just to get the hang of it. The way it works is that you tilt your lens to pinpoint your focus on the frame, then you use the focus ring to tweak the focus then you set your aperture with the aperture ring. The composer pro’s metal swivel ball design provided smooth repositioning of the focus, after you set where your focus it, you turn the knob closest to the lens mount to lock the ball in place. This prevents you from accidentally moving the tilt to another position. So the steps involved are setting the aperture, setting the tilt, then setting your focus.

The lens has no electronic contact with your camera. It does not report the aperture value in the image info. No contact also means that the focus is all manual. So anybody who uses autofocus all the time has to get used to focusing manually with this lens. It is also the reason why the aperture has to be controlled in the lens not in the camera body.

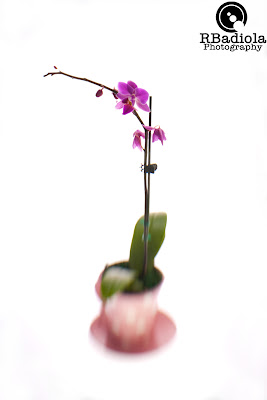
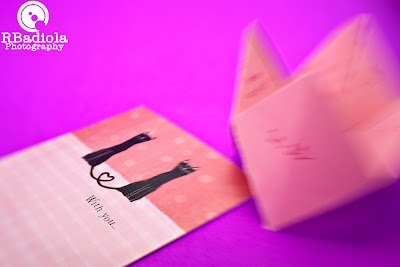
I went in the studio to try this baby out. From what I found, the lens has decent image quality. It's a special purpose lens so don't expect it to be your walk around lens. The focus point usually has decent sharpness as what you'd get from a consumer lens. The thing that I'm not really crazy about is the blur on the non focused parts of the image. It is somewhat different from what you get with a regular lens blur. The blur looked really cheap, similar if you use motion blur in photoshop. I guess that's what really it's supposed to be. I've seen some good photos shot with this lens, though I still prefer the natural lens blur from an ordinary lens. I'm not saying it's bad, but as what I have said, this is a special use lens for special effects.


My verdict...this is one of those lenses that you just don't buy unless you know what you're using it for, like a 400mm lens, you just don't get one for the heck of it. Takes a while to get used to the tilt action for composing shots. There are tutorials on how to use it at the Lensbaby website. Once you get used to the tilt/composing thing I don't see why this lens would limit your imagination. As I have said, I have seen shots that look like crap on numerous websites using this lens...although there are shots that wowed me when I realized that the same lens was used on them, it all depends on how you use it. Just remember, if ever you get one use it wisely.

Sunday, April 8, 2012

Going around Navy Pier in Chicago


For the 2012 Chicago flower and garden show we went to Navy Pier. As we all know, Navy Pier is one of the best tourist attractions in Chicago. Well, it's basically a pier in Lake Michigan. Navy Pier has it's own movie theater, ferris wheel, restaurants and many more. The flower and garden show is usually held here every year.

So while the flower and garden show is going on, I managed to go out and take some shots. My gear included my 5d mk2 and my 17-40L. Set my camera to aperture priority and off I went. An ultra wide angle lens is no doubt the best lens to take when going to navy pier. By the lake you have an awesome view of the Chicago skyline, with a lot of docked ships to photograph too.


This docked ship was awesome to photograph with the ultra wide angle lens.


The ever famous Navy Pier ferris wheel.


Chicago skyline by the pier


The ferris wheel, front view.


The shakespeare theater in the pier...taken while I was walking.


One of the lighthouses in the pier.


Another view of the shakespeare theater up close.


A sculpture in the pier.


Navy Pier is highly recommended for photos. I wish I could've stayed later to photograph the ferris wheel with a low shutter speed, Maybe I can do that sometime!

Monday, April 2, 2012

Apple shot

I shoot food for stock photos. Food photography is awesome...if you know what you are doing. For some photographers, food photography is a nightmare. I guess it depends on what you are shooting. Fruits and vegetables aren't so bad. Newly cooked food is kind of a pain to shoot. Basically you'd have to arrange each element in your cooked food to make it look better. Professional food photographers even use vaseline to make some of the dishes look more appetizing. Of course, you're not going to eat food with vaseline in it.

Most of the time I just stick with fruits and vegetables. All you have to do with them is wash them, then position them in your shooting table. I make sure that the actual fruit I pick is free from blemishes and bumps and scrapes...if in case they do have them, I fix them in post processing. Pretty simple stuff.

For this shot, I used 4 lights. I know I could've used less lights but the lights were already set up in my studio so might as well use all of them. I position 2 lights in the front, 45 degrees to the subject from each side, another light on top of the subject, and then a light that will illuminate the background. I prefer blowing out the backgrounds with these kinds of shots. I used the light on my right side as a fill so I cut the power half of what I'm using for the main light on my left. The top light was slightly underpowered based on my main light too, then I went full power on the background light...for the overexposed effect on the background.

I used my Sigma 70mm EX macro on my Canon 50d for this shot. I attached it to a tripod and then focused manually. I set my aperture between f11 to f13. I need the most depth of field that I can get for these 2 shots. Also with that amount of light, those aperture values are supposed to cut that much light off. I then took my shots.


I loved how this photo turned out. Just seeing the tops of the apples.


I went in closer for this shot. The f13 aperture still gave me a shallow dof because I was close to what I was shooting.


Now that I have a plexiglass shooting table, It's easier to overexpose the background just by hitting it with a strobe light from behind. I highly recommend getting one if you do a lot of shooting like this.