Tuesday, May 31, 2011

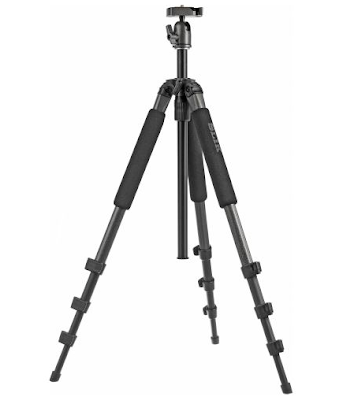
Slik Sprint Pro II GM Tripod with Ballhead


I was looking for a nice cheap and lightweight tripod when my $20.00 tripod snapped with my 50d in it. Good thing it fell on the carpet and not on concrete.

I was browsing online which tripod is good on a $50.00-$100.00 range. Alas, I found this on the BH photo website.

The ballhead was ok for light use. If you are using a monster lens such as the 70-200, I suggest you buy a ballhead that can handle a heavier load. So I basically sold the ballhead that came with it and bought a better one. I will review that next.

Fully extended, the tripod actually isn't bad at all. It still is pretty stable. The only complaint I have about it is that when the legs are not extended and the camera is in portrait position the tripod has a tendency to tip over. You can fix this by adding a counter weight on one leg. Other than that...it is a best buy for this price range.

The tripod legs can also be folded to make it really low to the ground, very useful for macro shots.

Portability is a neat feature of this tripod. It's actually shorter than my $20.00 tripod because of the ballhead. I just put it in my camera bag's outer pocket and I'm all ready to go.

If you are looking for a tripod that is really sturdy for the price...get this one. You'll never regret it.

Get it from here.

As always BH photo never fails to give you the best service for photo and video equipment.

The tripod image is from the BH photo video website.

Wednesday, May 18, 2011

Front, side, and backlighting a subject

Flash photography is an ever evolving art. It requires mastery of lighting techniques, positioning, and applying the theory and science of light into your photographs. It is a never ending quest to experiment and to keep on trying the best ways to apply flash in a photograph.

I started photography using my pop up flash. Then I bought a speedlite, then I bought a studio light, then I bought another...and another...and then I realized, I really don't need that much lights at all. All I needed to do was position the lights that I get the results that I wanted. I've learned that the fewer the lights, the more dramatic the lighting will be.

I started photographing flowers years ago and I admit it is really addicting, especially if you get your lighting right. So I started doing experiments with my lighting. I was kinda tired of using the usual 2 lights in the front setup . It produced a rather flat, commercial type of lighting. The usual "everything is lit up like crazy lighting". I started to backlight my subject, and also tried lighting them from the sides. Anything just to get away from the usual...and boy did I get results.

When doing this, make your lighting uneven as possible. Or you can setup a ratio between your main light and your fill light or backlight, for example having a 1:1 lighting ratio between the main light and the fill light means that the power of both flashes is even, which would make the lighting flat. If you set up a 2:1 ratio, that will mean that the main light will have twice the power of your fill light. A 4:1 ratio means that your main light will have four times the power of your fill light and so on.

Start with a simple one light in the front and one light on the side approach. Make your front light your main light and the side light your fill, or try reversing it.

Here's what I got for that setup:


Here's the result of backlighting a subject and having the light in the front less powerful than the backlight:


and here's the result of having a light above the subject at 45 degrees, and then having the main light on the right side of the subject:


The trick is to experiment. Be crazy, be creative!

Saturday, May 7, 2011

The ND filter


Ever wonder how photographers do those slow speed waterfall shots with smooth flowing water on broad daylight? Of course they do it with really slow shutter speeds, but a slow shutter speed means letting more light in, which means if you are photographing a waterfall at noon when the sun is high the light levels are so high that you end up overexposing your photo. Sometimes even when you close your aperture to like f18 or more, you still get parts of your photo overexposed. Although closing the aperture that much or more with a non full frame camera causes diffraction, it is not really advisable.

The solution to this is using a filter called a Neutral density filter. A neutral density filter is a filter that limits the light coming in to your cameras sensor. It's like sunglasses for your eyes. Neutral density filters are supposed to be neutral in color. They are not supposed to shift color or put a color cast in your images, that's why they are called neutral.

The degree of light transmission is determined by the number following the ND label. For example, ND2, ND4, ND8 and so on. An ND2 means the light coming through is 50%, while an ND4 means the light coming through is 25%, an ND8 by 12.5%...and so on. There are also ND filters that are adjustable...although those cost around like $100 or more. They basically work like circular polarizers.

So basically go up to a waterfall, snap your nd filter into your lens, set up your camera on a tripod, then tweak your settings. Meter your exposure with your ND filter on. Set your shutter speed to a second or slower and then adjust your aperture without overexposing your image. Better yet, set your camera to shutter priority to make things easier. Bracket your shots if necessary. Remember, the slower the shutter speed, the smoother the water flow will look.

ND filters can also be used in a studio to achieve maximum depth of field from a wider aperture with very powerful lights. It also allows you to minimize your shutter speed outdoors if you are using a flash so you stay below the flash sync speed limit.

Here are some of my shots using an ND filter:

Tuesday, May 3, 2011

The beauty dish


I was working one time in our studio at work when our photographer showed me this light modifier called a beauty dish. It was this piece of aluminum (I think) shaped like a pan, with another piece of aluminum in the center of it. It snapped directly to the lights that we were using and our photographer used it to photograph products. One time we had a model, he used it to highlight the edges of the model from the side. I kinda liked how it highlighted parts of the subject so I decided to get one myself.

I ordered one online. I ordered the dish that snapped on the speedlites instead of the studio lights. It was around $40.00 plus shipping. It arrived within a week.

Looking at it after grabbing it from the box, the beauty dish seemed to be well constructed. Not flimsy and fragile at all. Assembly was required but it wasn't that hard. So I ran up my studio and snapped it on one of my speedlites. It held my speedlite pretty good. I then attached it to my light stand to try it out.

The beauty dish gives you this lighting that is kind of unique. It gives you highlights where you want it. It actually makes your highlights more pronounced than a softbox, but softer than a snoot or a barebulb. So the highlight level is in between very soft and very harsh. It gives the portrait more pop without burning out the highlights. Similar to the effect of compressing your highlights and shadows in the levels adjustment in photoshop. I guess the aluminum piece in the center prevents the highlights from being blown out while giving you that pop that you wanted in portraits.

I am very pleased with the results actually. For portraits, the beauty dish is one light modifier you should have in your arsenal.